
Edit my RAW - PRO vs AM
I shared three of my RAW photos for you to edit and I was blown away by the response. I had over 2000 people edit the photos and the results were incredible. It took me over a day just to look through them all.
These are some of my favourite but it doesn’t feel right not to share them all so please feel free to share your edit on Instagram and use the hashtag #NDRAW2021 that way everyone can see more of the edits.
I will share on Instagram the prints of my 3 favourite of each image this week.
Make sure you click the image if you want to see it larger.
Thanks to everyone who took part in this. It was an amazing response!!!!
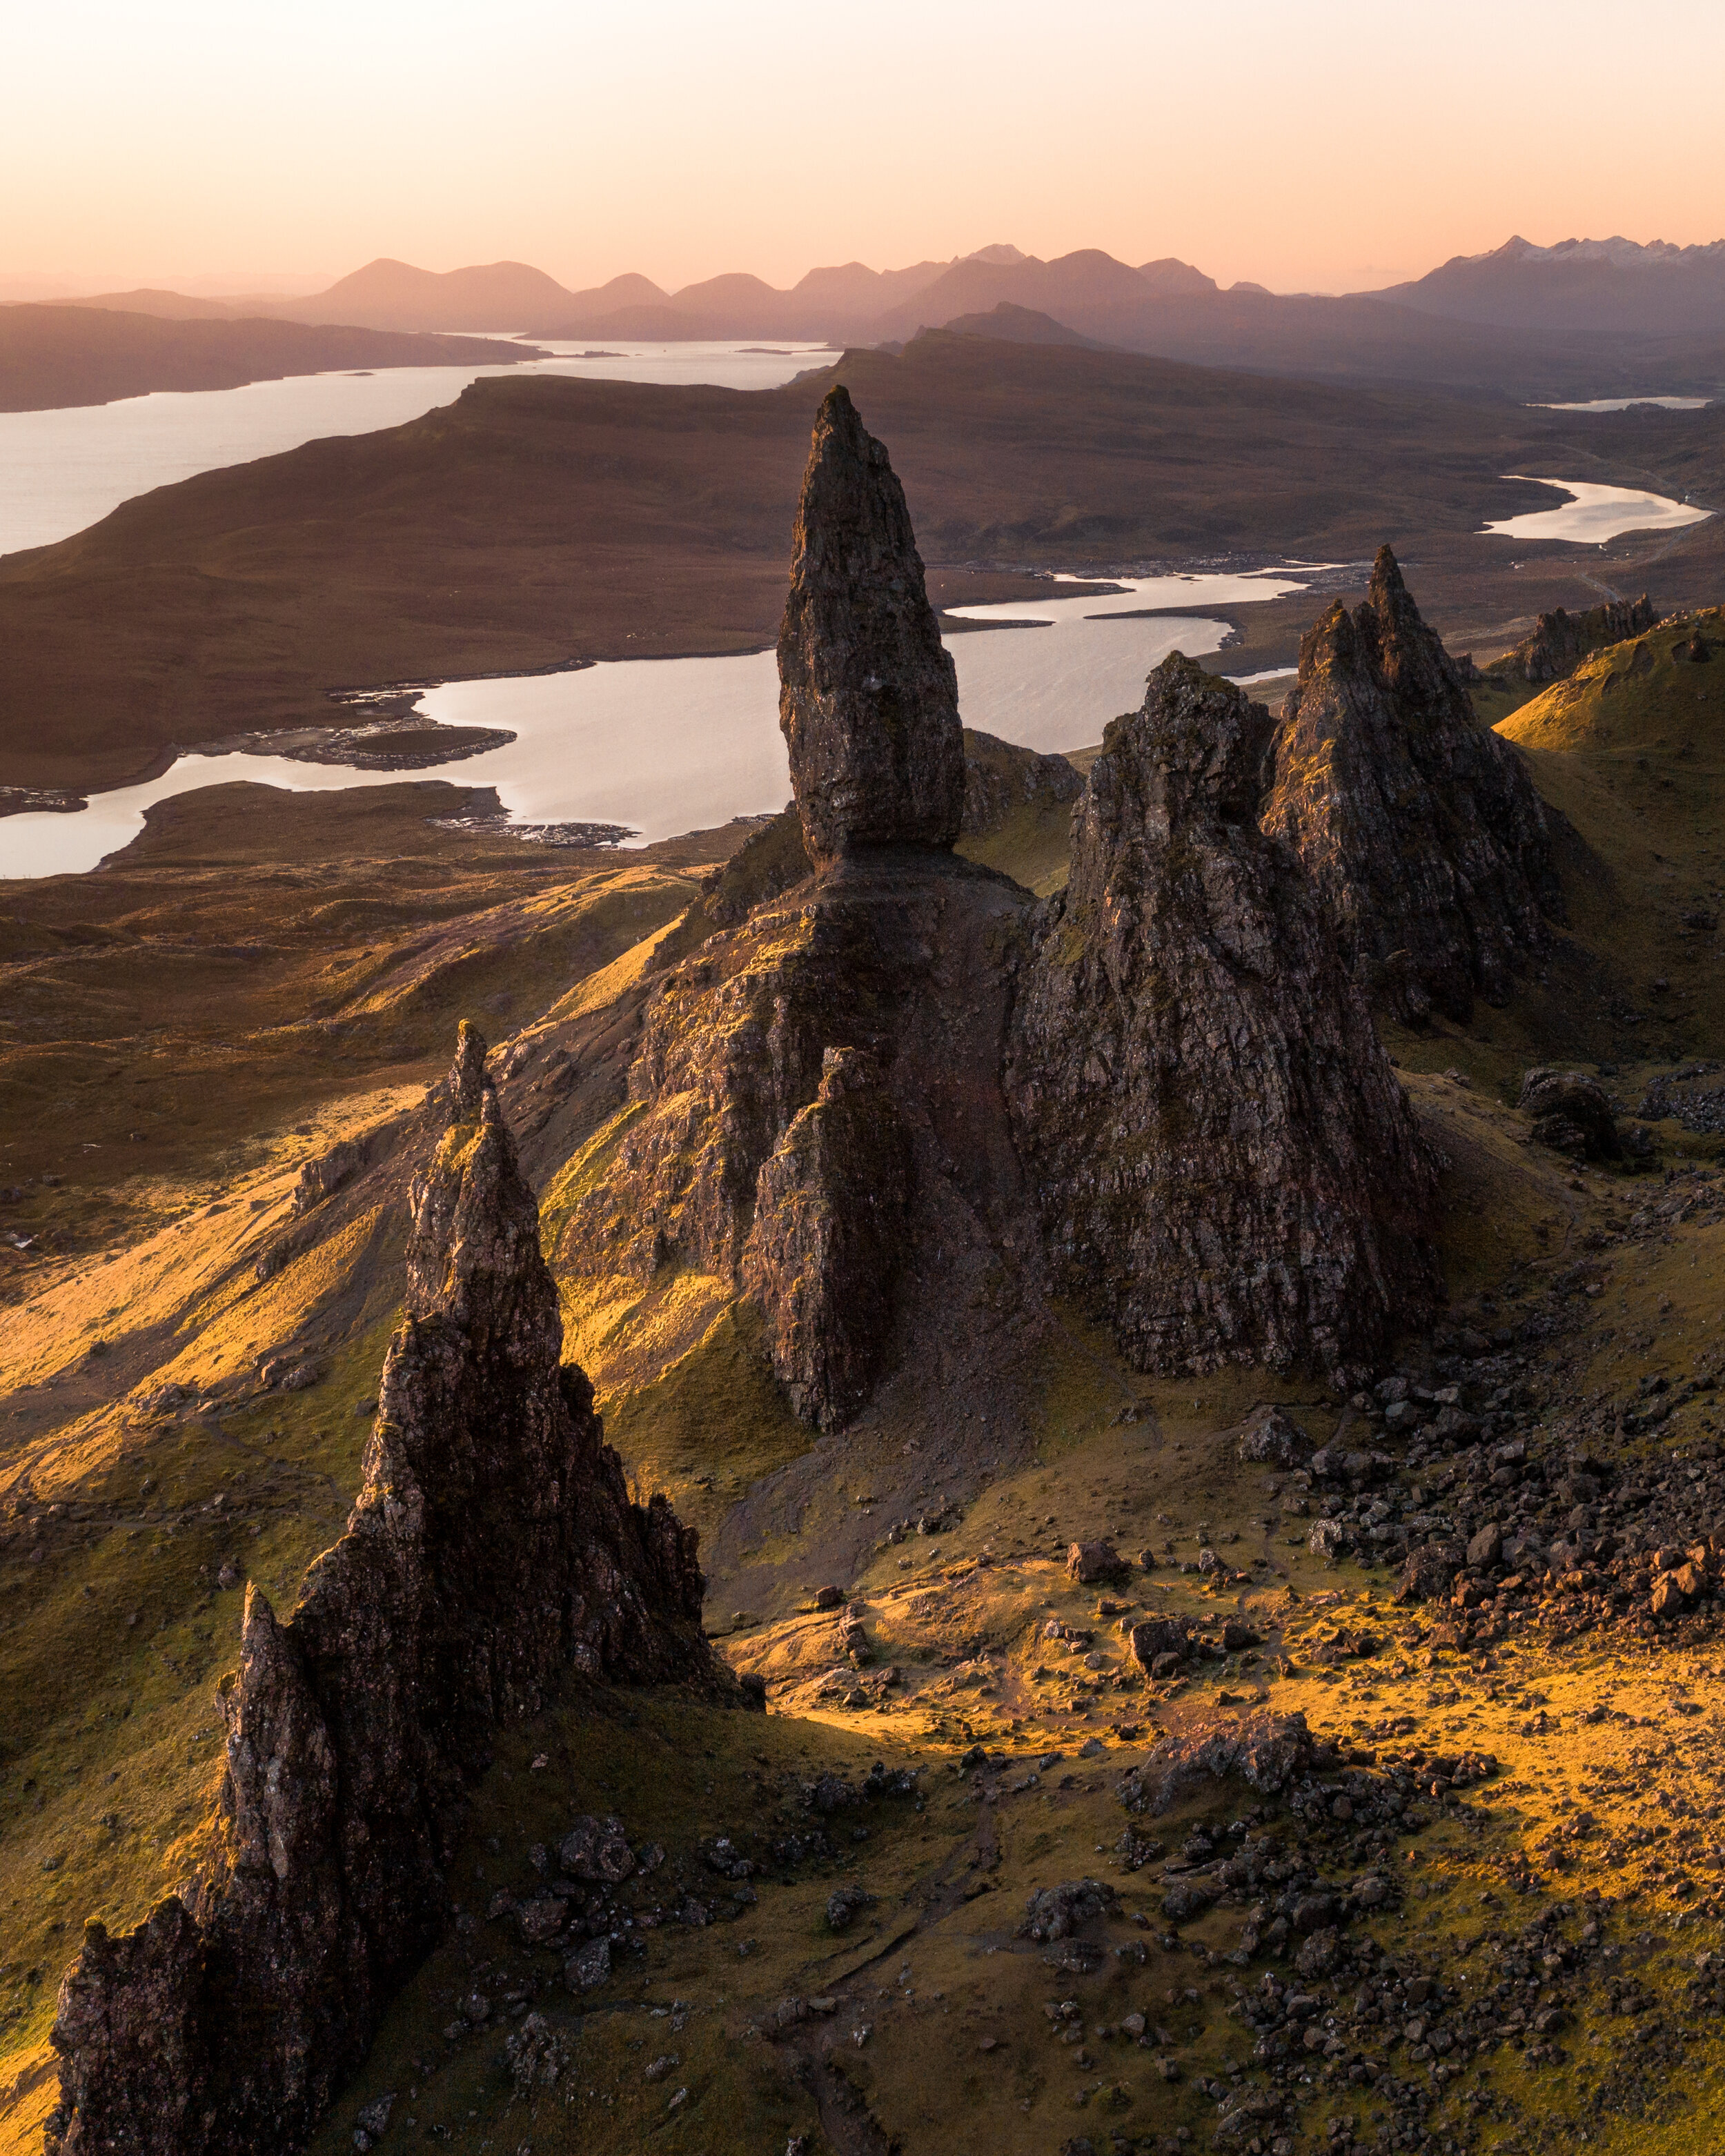
Image 1 - Old Man, Skye
This is a sunrise shot I took of this ancient landscape. I felt that this image offered a lot of possibilities for edits and loved the warm colours of the golden morning light.
Mark Littlejohn’s edit and his words
Its an interesting challenge when someone asks you to process one of their images. Usually when I take a picture I have a sense of what its going to look like as a finished product. I've already previsualised it. But I've been to the Old Man of Storr before so its not as tough in this case. Its an ancient landscape and I wondered about processing it with a foreboding feel. But despite its age it is very much a living landscape and I wanted it to feel more vibrant. I've concentrated on the tones in the grasses and heather. Its split toned for a warmer feel. I've also cropped in slightly from the top right - retaining the aspect ration but making the Old Man very central and raise the Coulins higher in the frame.
WINNER - Carrie Jennice
I wanted to create a soft feel to the image but bring out the textures in the rock. I also wanted to try and create a light feeling to the overall look of the shot without losing some of the character in the dominant rock formations.
For me this photo screams Lord of the Rings, so I have tried to capture that feeling. Stunning photo and it was a pure delight to have the opportunity to edit it. Thanks!

Matthias Heidrich
I used Lightroom (mainly local adjustements for dodging and burning, color grading, reduced clarity overall and raised clarity in the dark areas) and Photoshop (spot healing & curves). I aimed for a natural edit but tried to move the sunset in the middle of the image. Hope you like it.

Brand new to editing with lightroom

Pere Sanz
WB and basic adjustments in Lightroom and some dodging/burning and Color Painting in Photoshop
Davee Tube

Brilliant photo Nigel, I really enjoyed editing this one and thanks for giving us the opportunity. It's made me feel far more impatient now to get out and travel again!
For me, the light coming in from the left was the most obvious thing to pull out here - but I also wanted to try and emphasise the contrast on the rock formation too as I found this absolutely stunning.
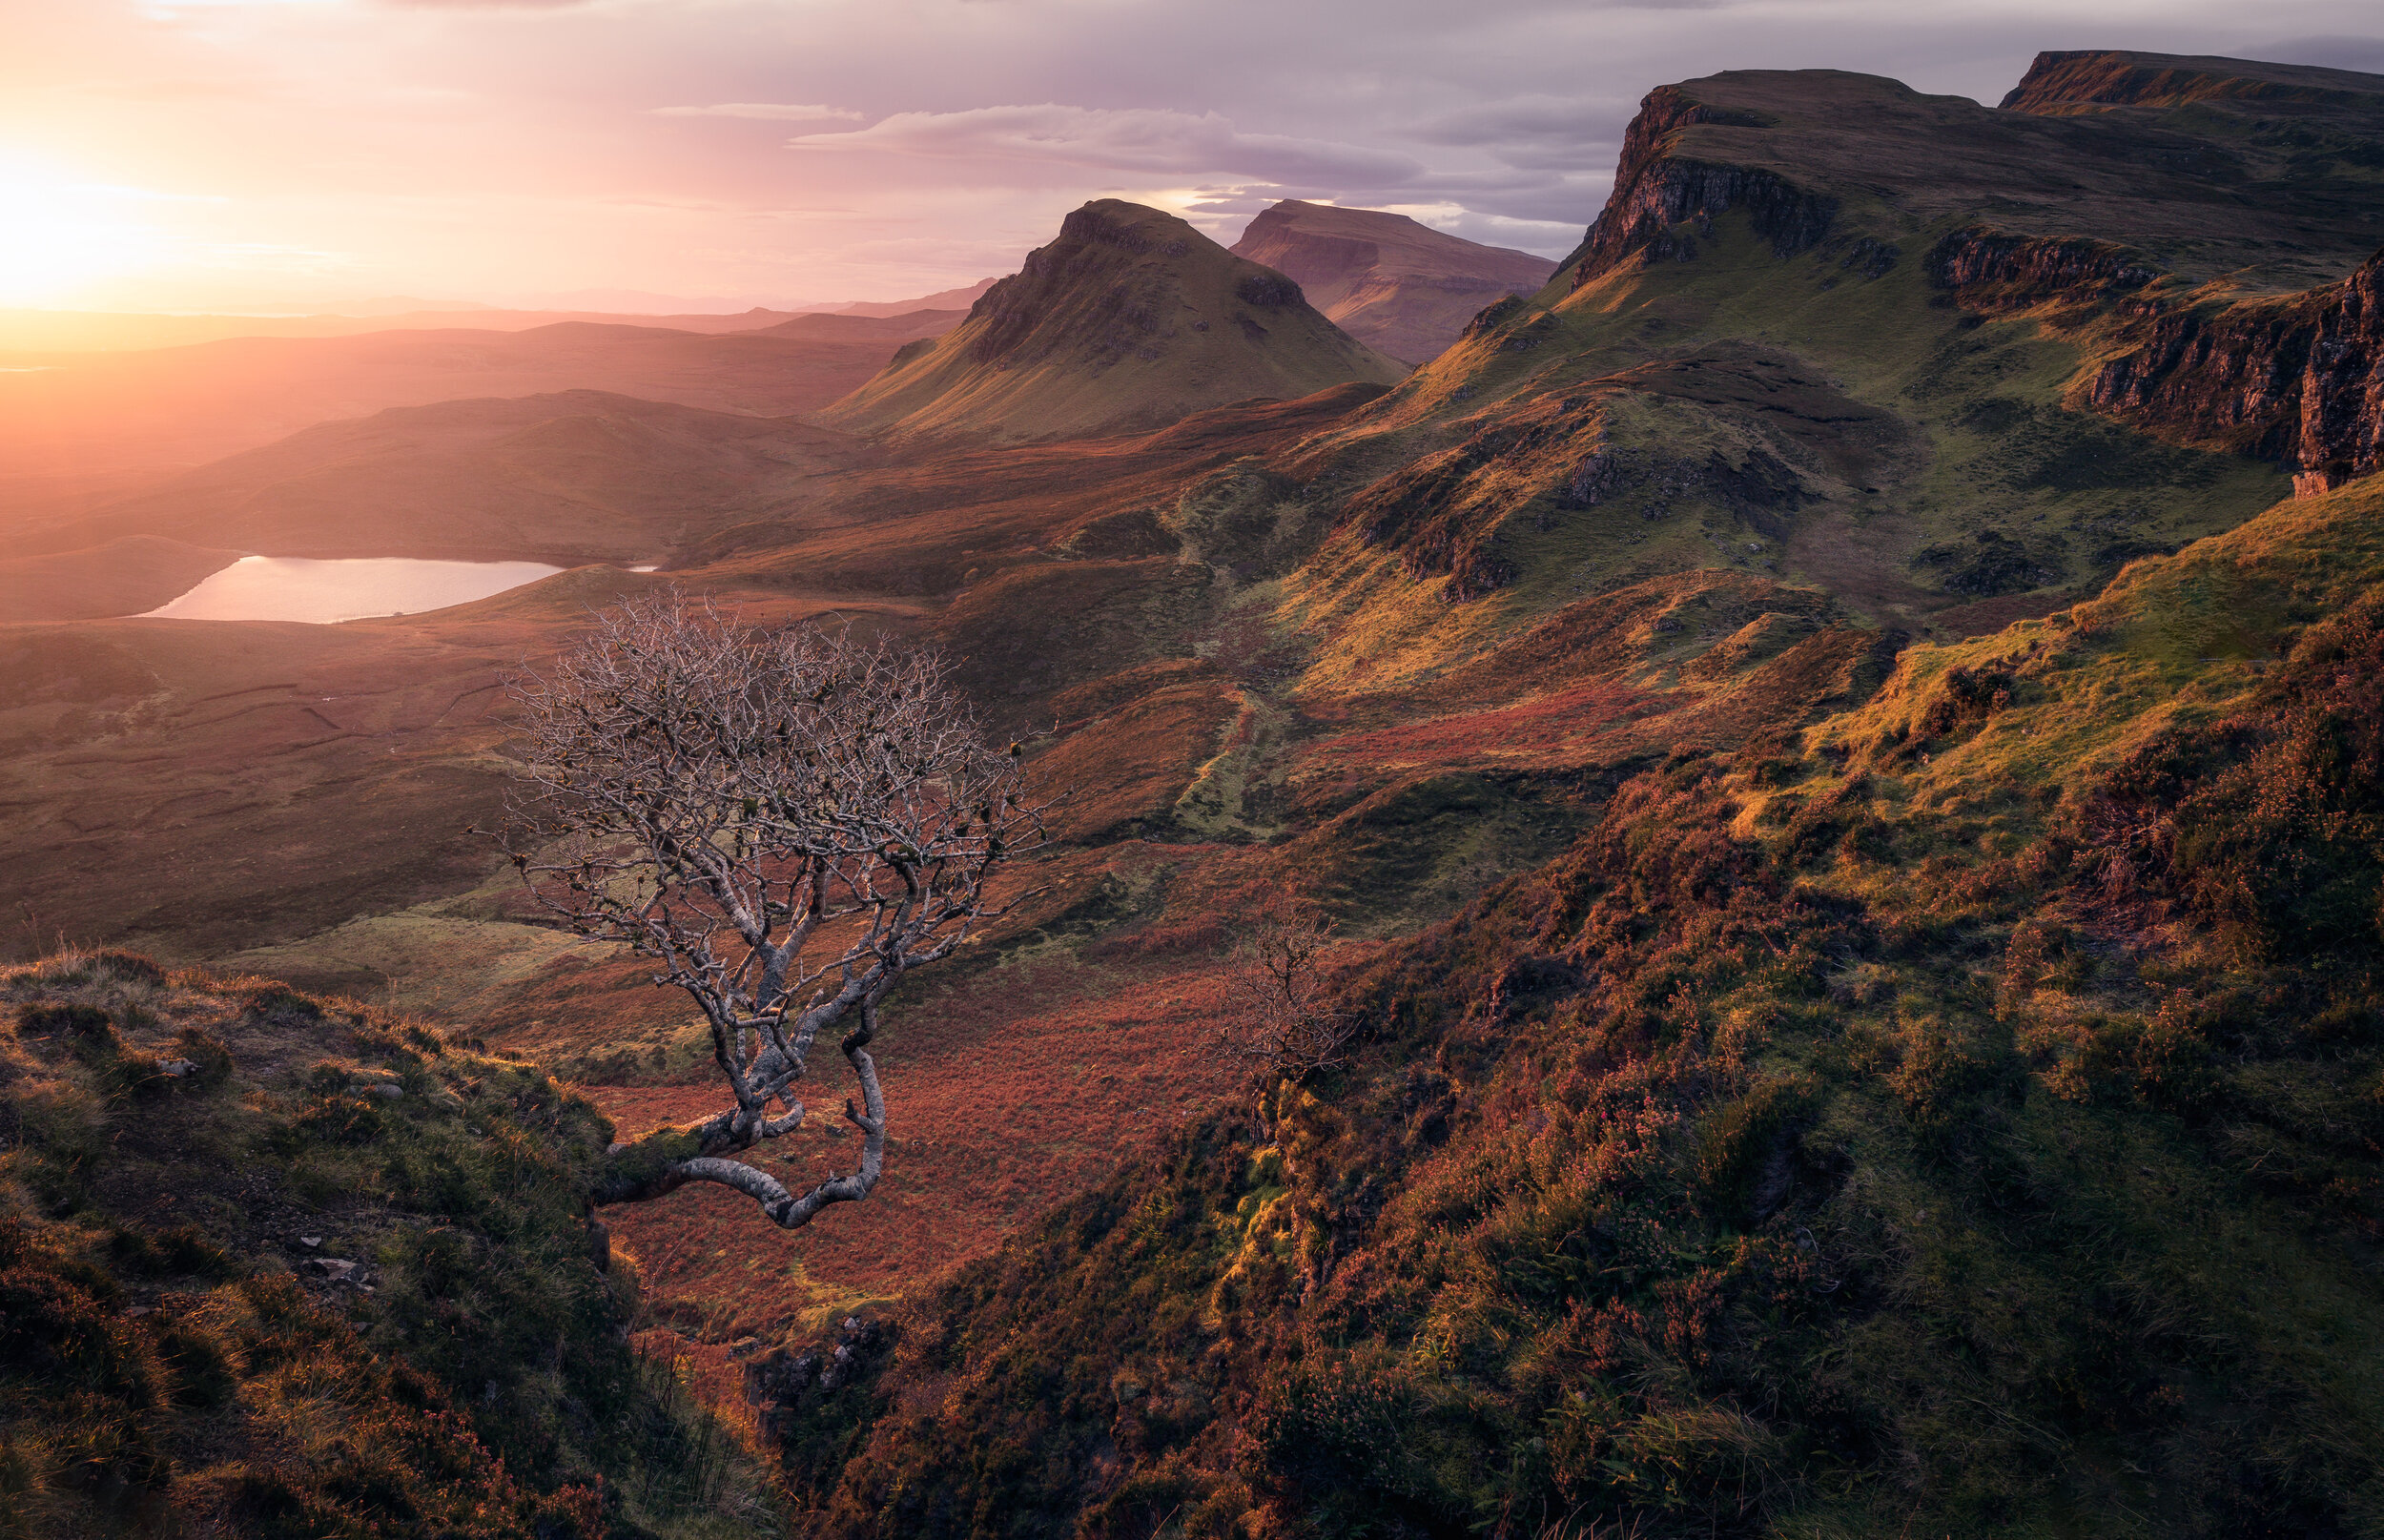
Image 2 - Quiraing, Skye
This was such a stunning morning and this was the only image that I managed to get as the light went so quickly. I concentrated on lining the tree up as well as possible to avoid any distractions. It is a famous scene but actually when you get there there isn’t too many different compositions that work.
James Popsys Edit and his words
Beautiful image. I went for a 16x9 crop as I often find that bringing mountain summits to the very top of an image can help make the peaks look a bit more punchy and dramatic. I lifted the temperature and exposure of the sunrise as it simplifies the scene for me, but I was careful to retain some cloud detail on the right hand side as I didn’t want the entire sky blown out. I think keeping some of that detail also helps emphasis the power of the sun.
I did a touch of clone stamping in the mid ground to remove the distractions underneath the lakes, and darkened the foreground on the right hand side to try and help lead the viewer to the more interesting parts of the scene.Finally, I added some luminosity in the warm colours to increase the contrast between the areas bathed in light, and those in shadow.
Michael Shainblum’s edit and his words
So first off thanks again for including me in the editing. It's quite a beautiful image to work with. So some thoughts about it. compositionally I think it works well. I made two different versions here (check out 2nd crop below). One with a crop so the tree sits in the middle of the frame. It creates a bit of symmetry with that V shape in the hill meeting in the middle. The larger peak on the right side then balances out the image with the sun on the left. Although I probably could have darkened the road a bit more in that, as it meets the edge of the frame. I also did an edit on the original image crop, this time really highlighting the hillsides on the left to add interest there and help to bring more balance to that side of the frame. I think I ended up liking the original more than the crop after a bit of dodging/burning.
Really what I wanted to do here was bring out the beautiful colors and tones with these stunning conditions. It was a little bit of a challenge getting the sky to flow given that there were blown out highlights and a single exposure to work with. I also wanted to accentuate the contrast between those warm tones spilling across the scene and the cooler tones in the shadows and the sky. This image was just in general a lot of fun to experiment with. I used a bit of dodging and burning in here and some luminosity masks as well.
Michael’s 2nd crop with the tree in the middle
WINNER - Cathy Mildenberger
I Used haze in the background. Softened sun ring glare. Cloned out some small distractions. Was unsure if it was sunrise or sunset to adjust the temperature (went with sunrise). Did some dodging and burning. Cropped off a little from the right.
I did edit the photo first in Lightroom where I did some basic Adjustments and used some filters to draw attention on the right areas. In general, I prefer to keep the colors natural so I didn't make a lot of changes there, but I do like this soft and dreamy look so I decreased the clarity. For me, this photo lookes like a scene from a fantasy movie and it looks like elves and dwarfs could live there, so I tried to keep that mood.
Alessandro Losacco
I tried editing this photo because i've been there and it's fantastic. Thanks

I wanted to try and subtly transition the picture from warm to cool with the eye going from left to right so by the time you realise it has happened, you've already seen it.
Just a thank you for having taught a newbie so much!

Mateusz Sosna
Thank you for letting me work on my rendition of your photo - it started with an idea of a chilly, frosty morning, so I added some mist, used local adjustments, separated the mountain range by adding some more fog inbetween. Final, albeit very small touch is a fishing boat in the middle of the lake, emphasising the very early hour of the day.

Such a nice image to work on , I love gnarly old trees , I tried to make that more of a feature and not over process the image just lift the highlights and some of the colour. Like the mood of this edit.

Adrian Dyer
I've just started to learn to use Lightroom properly to edit photos. Thanks for the opportunity to try out some editing, I'm interested to see a breakdown of how you would edit it.

Tim
Hey Nigel, well thanks for sharing! It was a little struggle to decide what crop I like best. In the end it is the closer one, focused on the tree and less on the landscape. I choose a warmer feeling with some hints of green due to the underlying colourtone and feeling of the image. The edit: all of the standard points, quite some work on the curve. Of course colour adjustments and some tweeks in the highlights and shadows. At the end I tried to clean the image a little bit with Photoshop (the road and lens reflections).
Not sure about the signature on the image Tim (Nigel)

Not sure I did this any justice. After making my edits, I used a square crop creating a triangle between the sun, mountains and tree. The lake in the midground also points to the sun. This was fun!!!
Image 3 - Tryfan, Snowdonia
Mads Peter Iversen’s Edit and some words
Fixed the lens distortion to make a more realistic mountain. Emphasized the glow from the sun breaking through. Balanced shadows and highlights as to be able to see the foreground, yet kept the contrast as to avoid the "grungy HDR look". It was about keeping the light natural. And I cleaned up distractions such as vignetting, lens flare and a few specular highlights in the foreground.
About the composition: Epic shot and I can totally see what you went for. I am not too happy with the foreground of choice as I find it to be quite messy. Seems like the wanted to use the stones as a foreground, but all I care about is the beautiful small waterfall in the lower left. I would have emphasized the water more as a foreground.
WINNER - Famke Oansee
Hi there from the Netherlands. Thank you so much for taking the time to educate others like myself. I look forward to each one of your videos as they are so enjoyable to watch. Your photography, your editing skills and -just as important- your teaching capabilities are like gold to me. Thanks to your videos my vision of how my images should/could be after editing, is growing. Still a beginner though, I'm nowhere near being a good photographer. But as a hobby I do enjoy my time spent on it outdoors snapping, and indoors editing. I can't wait to see the outcome of other versions of these amazing images. I will definitely learn from them and your feedback in next weeks video. Thanks again, and stay safe and healthy.
Greetings, Famke oan see (which translates as girl-by-the-sea).
Editing was done in LR only, various grad filters, linear and circular, some color adjustments, but not a heavy edit in my opinion. Having a properly exposed image with a great composition definitely helps the editing process, seems like those are still issues to work on for my own photos.
Thanos
First of all thank you for giving us once again the oportunity to edit your amazing photos! I am Thanos from last time (not THE Thanos haha). I really enjoyed it. I'm also excited about the other amazing photographers that are going to participate to all of that, and especially James! I love his edits and his sence of humor! Greetings from Greece
I really enjoyed editing your photo. Thanks to your last video I discovered new editing tools and techniques which I used when I was playing with the light in the photo.
I decided to warm the image up and increase the exposure by about 2/3 stop, followed by emphasising the valley with the lake using a radial filter as I felt this is the focus of the light. I also removed the flare in Photoshop.
I had to apply a luminance gradient filter to the sky whilst also making slight brush adjustments to make sure I didn't affect the edges of the mountains and the snow.
It also looked as if the light was skimming the rocks in the foreground so I applied an adjustment brush to emphasise them as well.
I have also cropped the image very slightly to remove a couple of very minor distracting elements at the bottom of the frame, which became more obvious after my edit.
Thoroughly enjoyed editing these files, this photo is my favourite out of the three.

I have a personal project where I edit my photos specifically to be Wallpapers for phones (it's not as easy as it sounds! The top third has to be clear for the time/date, but being completely clear isn't always interesting, etc). I just reached 503 yesterday! (http://fullerfotos.co.uk/index.php?/category/550).
With this in mind:
I liked the tree in this picture, but had a hard time getting a composition that didn't seem too busy to me (the sun, the tree, the mountains, the windy road, the light on the hills, etc.). I thought about cropping it and I had the bright idea (no pun intended) to (no, wait, pun totally intended!) turn the picture into a Fone Wallpaper!
The sky didn't look right cropped (especially with just the edge of the sun being in the left corner), so I tried out Photoshop's Brand New Sky Replacement Tool--using a picture I took on the very first day of owning a DSLR.
I hope you enjoy the different take on this challenge :)

I tried to emphasise the foreground and create depth by bringing out the sun haze in the background and having a higher contrast in the foreground.. The Jpg blacks seem blacker than they appear in photoshop and lightroom, ive never noticed that on my own images, id love to know why that is if you are ever short of a topic to discuss in a video ! Thanks for the fun challenge !

Ben Mitchel
I'm not that experienced in using Lightroom and have used this current lockdown to learn the basics (using your videos) so I thought I would give this a go. I feel that this edit gives the image some warmth and depth that was missing in the original RAW file, and now the eye gets lead through in a much more fluid way.